Manual Filament Change
When fixing up the print recently, I also needed to change filaments as I switched from the wood PLA to a white PLA for some text to be printed on the top.
I've done this before - in OrcaSlicer after you first slice the print you can look at the layers in the Preview mode to find the layer where you want to change the filament (you can use the up and down arrows to go layer by layer).
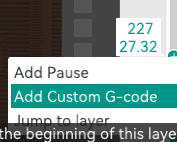
Once you find the level, right click on the bar on the right and choose Add Pause.
This will edit the gcode and insert a Pause. At that layer in the print it will stop, leaving the nozzle and bed temperatures as they were and you can then change the filament. However, the problem I've had is that it leaves the nozzle in place just above your print and if you have oozing of the filament (because it is hot), it leaves filament on your print. You can clean this off, but it can leave scarring.
While editing the gcode to allow to restart I ended up making an adjustment to the pause routine as well.
You can find the pause in the gcode - it will add a comment ;PAUSE_PRINT, and for my Creality Ender 3 V2 it inserts a M25 for the pause.
To prevent the oozing attaching to the print, you can simply move the nozzle up and away from the print while you replace the filament.
To do this, take the movement just after the pause, in my case it was G1 X96.008 T110.231 Z32.12 F9000 and put it before the pause (M25) and adjust it to above and away from the print. I moved mine to along the X and Z axes - getting access to the printer head might have been a bit easier if I had moved it a bit further, but it worked and I didn't end up with filament oozing onto the print.
I ended up with the following being inserted into my gcode:
;PAUSE_PRINT
G1 X86.008 Y110.231 Z42.12 F9000
M25


; printing object 20x4_brick-mini.stl id:0 copy 0
G1 X96.008 Y110.231 Z32.12 F9000
For any comments or feedback please leave a comment on the PR: Manual Filament Change